Makeup Tutorial: Step-by-Step Guide for a Flawless Look
Published: September 15, 2026 Last Updated: September 15, 2026 Have you searched for makeup tutorials on YouTube, only to
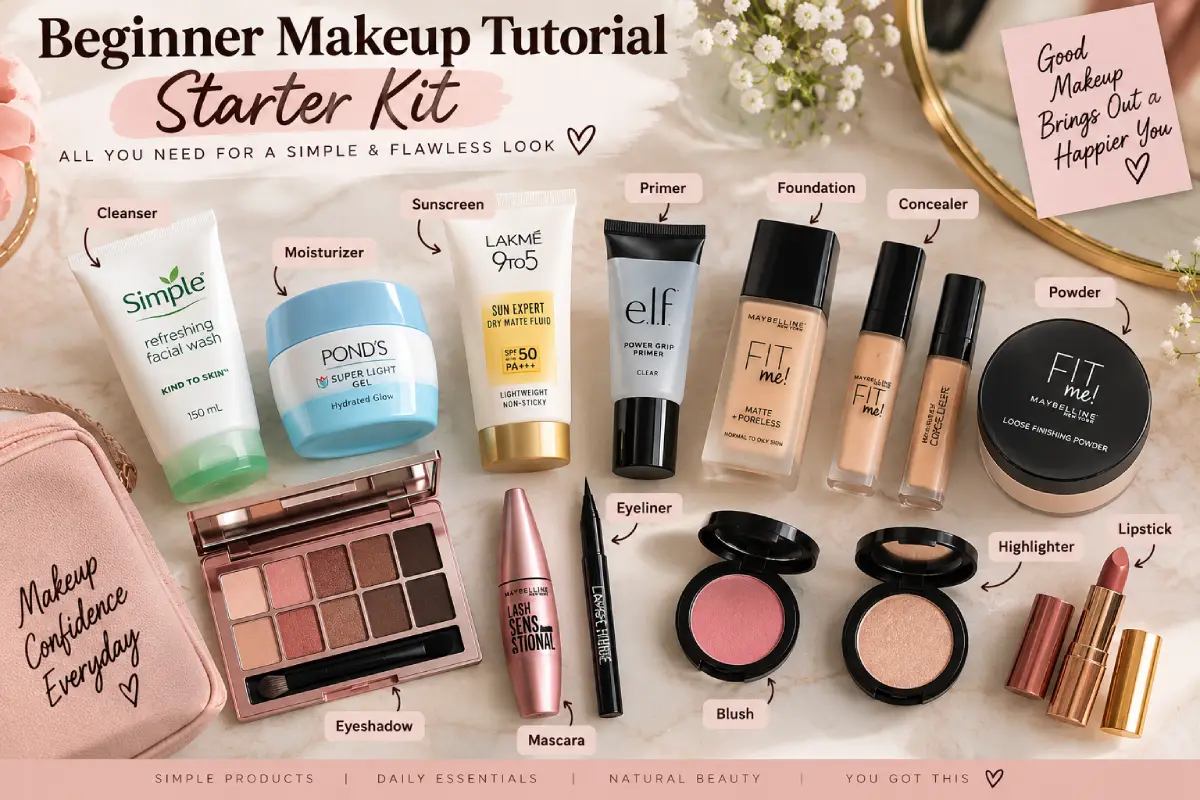
Have you searched for makeup tutorials on YouTube, only to end up with way more tabs open and more confused than when you began?Well, don‘t worry while a complete face of makeup may feel a little overwhelming, whether you want a smoky eye and bold, red lips or something much more natural, it‘s still just 10 simple steps.
This tutorial will take you through every step of the makeup application process on prepped bare skin, discuss the reasons for each step, and then direct you towards on more specific tutorials depending on the look you are going for.
Quick makeup order prepped skin, primer, foundation, concealer, setting powder, contour/blush/highlight, eyes, brows, lips, and last but not least, setting spray.
Why This Makeup Tutorial Works for Every Skill Level
The bulk of beginner tutorials either assume far too little or far too much and fall into one of two extremes one which, by not explaining the reasons for steps, leaves the reader confused about why they should bother, or too far the other way and makes the whole thing so product-centric that the reader ends up spending half the time shopping rather than learning.
Important lesson: normally the order of applying makeup doesn‘t change no matter what you use, what tools you use, or what makeup look you‘re creating. Once you learn the order, you can switch out different products later without a problem.
Rather than every step being in praise of one particular range, I think this tutorial is really about the approach and what you are trying to achieve in any given step. Once you are happy with the ‘how’ after completing this tutorial, the Makeup Essentials article (see link below) will get more specific as to which products are worth having.
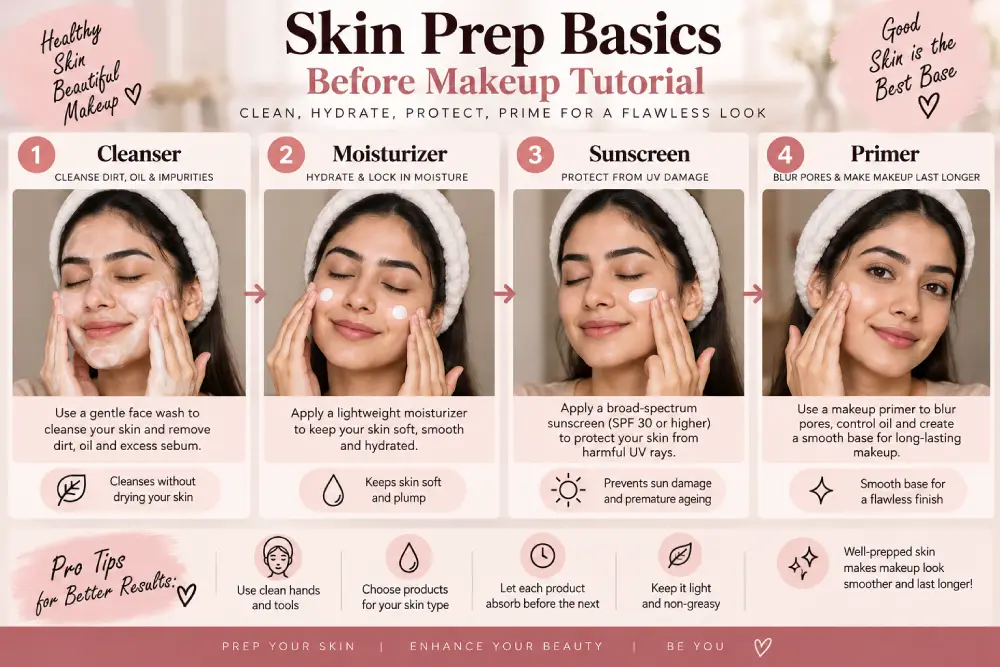
Before You Begin: Skin Prep Basics
Makeup performs better — and lasts longer — on well-prepped skin. Skipping this step is one of the most common reasons a look feels heavy or starts to break down by midday.
A simple prep routine looks like this:
- Wash your face to get rid of any oil, dirt or residue form the night before.
- Moisturize with a formula suited to your skin type — richer for dry skin, lightweight or gel-based for oily or combination skin.
- Consider applying a separate sunscreen during the day rather than relying on foundation with SPF alone, since makeup may not provide consistent coverage across the skin.
- Allow the product to settle into the skin for a couple of minutes before applying primer. Avoid putting primer directly on the skin if your skincare hasn‘t settled; because this could lead to sliding or pilling.
In humid environments or if you‘re going to be outdoors for a celebration, give a little more time between moisturizer and primer so your base doesn‘t run away.
Mini summary: Skin prep is not an optional extra step it‘s the base (literally) to achieve flawless, durable and natural looking makeup.
Want the full list of products worth keeping on hand for this stage and beyond? See [Makeup Essentials]([VERIFY LIVE URL]) for a complete beginner-to-advanced kit breakdown.
The Complete Makeup Tutorial: Step-by-Step Order
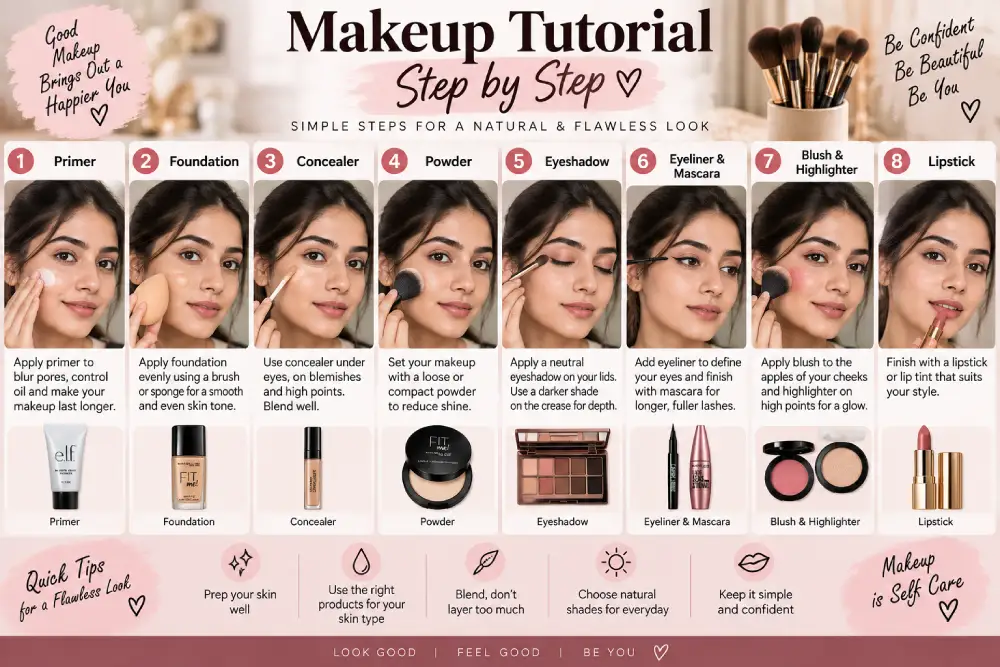
Here‘s the complete step-by-step progression, starting with no makeup on.
Step 1: Primer
Primer can provide an even, soft surface for foundation to ‘grab’ and can help to control shine (oily skin) or add moisture (dry skin). Usually a small amount, about the size of a pea, pressed lightly into the skin rather than rubbed over it.
Step 2: Foundation
Use the foundation with a brush, a sponge or your fingers–all three will do. What‘s most important is your choice of applicator and the effect you desire. Begin with a light layer in the centre of the face and use outward strokes to blend outwards. Remember you can always add more; removing excess product from the skin is difficult without ruffling what‘s underneath.
Tread carefully here: a common error is selecting a shade that matches the back of your hand rather than your jawline. Always test shades along your jaw in natural daylight. Indoor lighting can completely throw off undertones.
Step 3: Concealer
Concealer is great at specific blemishes, under-eye circles or redness, so don‘t load on loads all over your face, which is what foundation is for. A shade lighter than your foundation is good for under the eyes, while the same colour as your face will cover spots best.
Step 4: Setting Powder
Once you‘ve finished with your foundation, applying a light dusting of setting powder (especially on the T-zone and under the eyes) will set everything down and reduce the amount of creasing throughout the day. Skip if going for a dewy rather than matte look.
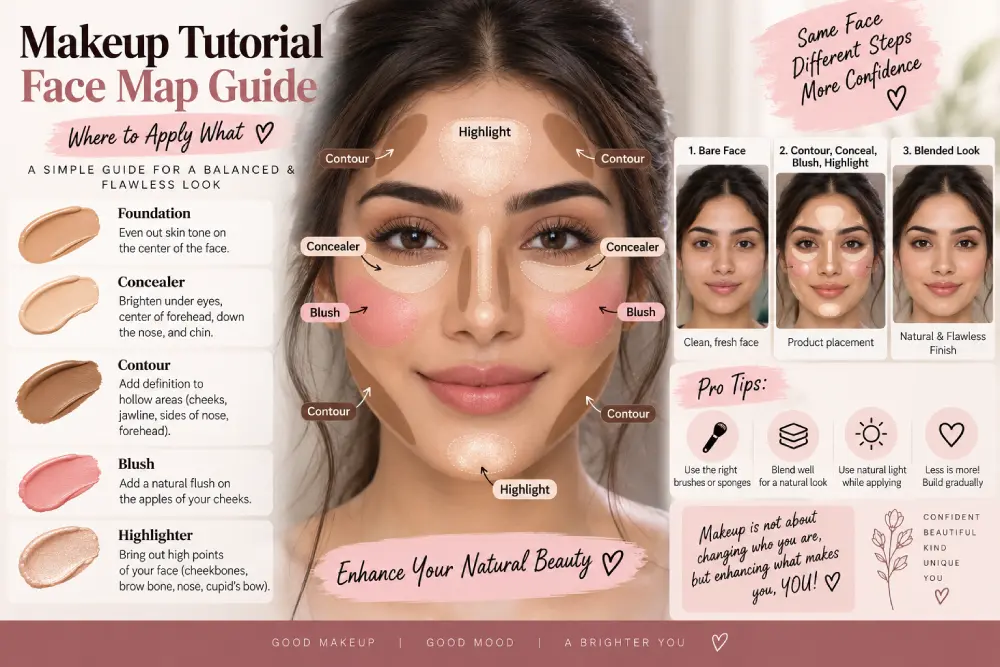
Step 5: Contour, Blush, and Highlighter
This is where dimension and color come in:
- Contour applies in the hollows of the cheeks; the jawline and Temples to subtly shadow these areas.
- Blush is applied on the apples of the cheeks (or a little higher, nearer the temples, for a lifting effect).
- Highlighter-applied on the highest points of the face cheekbones, brow bone, the bridge of the nose-to reflect light.
Important point: Always blend the edges of your contour and blush so that you cannot see the change in color no harsh demarcations which scream: I just put makeup on! Try using a slightly damp makeup sponge,one of the best tools for softening harsh edges.
Step 6: Eyes
Eye makeup can comprise anything from a single neutral color brushed across the lid all the way to an elaborate multi-shaded blend. For the beginner:
- Use a transition color (matte, medium toned neutral) over the crease.
- Use a slightly darker colour to block in more definition.
- If wanted, apply eyeliner to your lash line glittery and thick lines are a pain to keep looking good.
- Finish with mascara, wiggle the wand at the base of the lash and then pull through to the tip.
Step 7: Eyebrows
Fill in brows with light, feathery strokes never a solid line using the natural shape of your brow. Use a clean spoolie brush (or wipe off a mascara wand) to blend out the product and maintain naturally soft brows.
Step 8: Lips
Use a lip liner if you need more definition or longer-lasting color then complete the look with lipstick, gloss or tinted balm depending on the event.
Step 9: Set the Look
A setting spray is used to merge all of the layers of makeup and to set the makeup for a longer period of time, for humid climates or long events or days. Spray the face by holding the bottle at arm‘s length and misting in an “X” and “T” formation.
Mini summary: Nine steps sounds like a lot, but most of them take seconds once you’re used to the order. The full routine typically takes 10–20 minutes once it becomes familiar.
Once you’ve got this routine down, you’re ready to explore specific styles. Start with [Natural Makeup Look]([VERIFY LIVE URL]) for an everyday version of this same process.
Popular Makeup Styles and Aesthetic Looks to Try
Once you are familiar with the basic routine, the best thing is how you can adapt it to a style that suits you or the occasion.
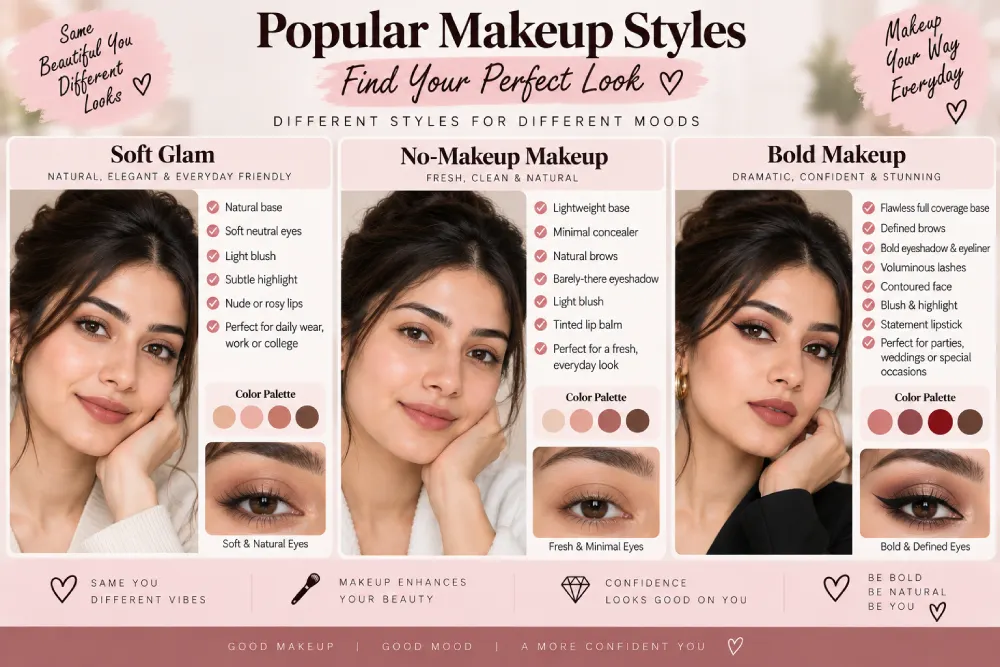
Some of the most searched-for and recognizable styles right now include:
- Soft glam a neutral base that is a little more defined in the eye area with a gloss sating lip that is usually done for semi-formal events.
- No-makeup makeup minimal coloration and a very light complexion, emphasizing skin textures instead of flawless coverage.
- Bold or graphic looks — using eyeliner shapes, colored mascara, or a statement lip as the single focal point rather than building intensity across the whole face.
Practical tip: Stand out with one strong feature per look (usually) either eyes or lips (seldom both strident).
Aesthetic Looks like Clean girl or soft grunge can sometimes have the so-called aesthetic in common but these are easier to discuss separately for when you do want a clear overall aesthetic or style rather than a single technique.
For a full breakdown of these styles and how to recreate them step by step, see [Popular Makeup Styles]([VERIFY LIVE URL]) or, for internet-aesthetic-driven looks specifically, [Aesthetic Makeup]([VERIFY LIVE URL]).
Latina Makeup Tutorial: Key Techniques for a Defined Look
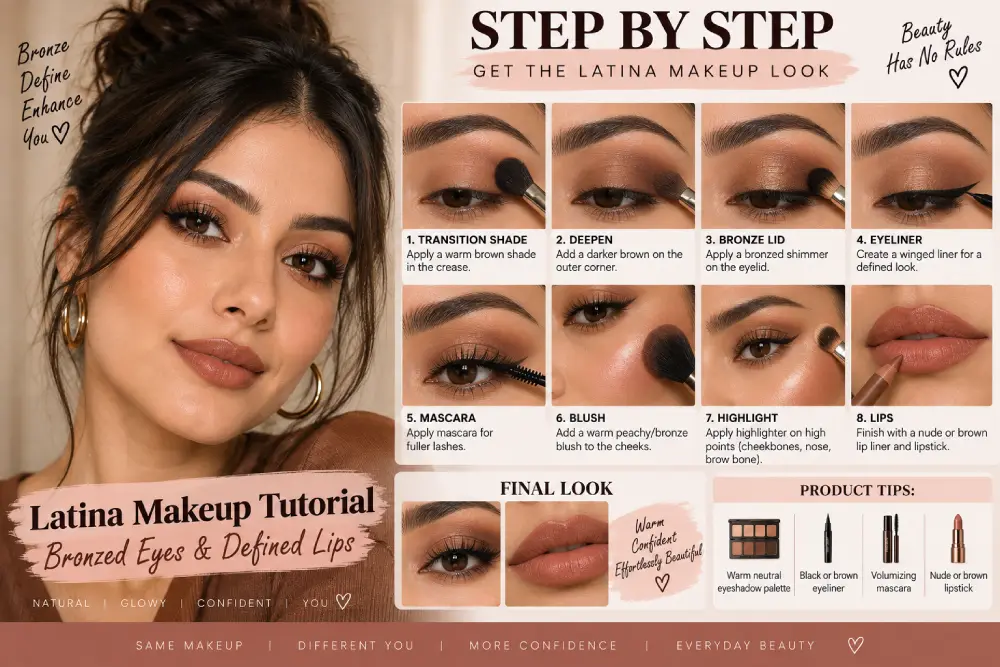
Because of how frequently they are searched online, there should actually be a rule book on how to do a latina-inspired makeup look, because they all seem to have the following in common: defined, arched brows; warm, bronzed eye makeup; lips that are lined and well-defined with either a matte or glossy nude-to-berry color (or a slightly darker version of your skin tone). It‘s all about the technique; the exact product is not quite so important.
Pro tip: If you love this look, the specific techniques (brow shaping, eye blending, lip lining) are worth learning bit by bit and not just skip through.
Get the complete technique breakdown in [Latina Makeup Tutorial]([VERIFY LIVE URL]).
Cute Makeup Ideas for Different Occasions
Not all looks are meant to be worn every day. “Cute makeup” is great for school, hanging out, events, and everyday functions because it‘s not as intense. It can include beachy waves, flushed cheeks, a little lip gloss, and high shine.
A few occasion-based starting points:
- Daily/school or work: Lightbase, cream blush, mascara, tinted lip balm.
- Casual outing or date: Tinge the lid with a light shimmer, a prominent yet gentle lip, and a touch more luminous.
- Festive or party times: Apply more dramatic color to the eyes or to the lips (but not both), use a longer lasting setting spray if possible.
Practical example: A cream blush stick, a neutral eyeshadow palette, a clear or tinted brow gel, and one versatile lip color can realistically cover school, casual, and semi-dressy occasions with only minor adjustments. If you’re still building out your kit, [Makeup Essentials]([VERIFY LIVE URL]) covers what’s actually worth having on hand.
Browse specific occasion-based looks in [Cute Makeup Ideas]([VERIFY LIVE URL]).
Common Makeup Mistakes and How to Fix Them
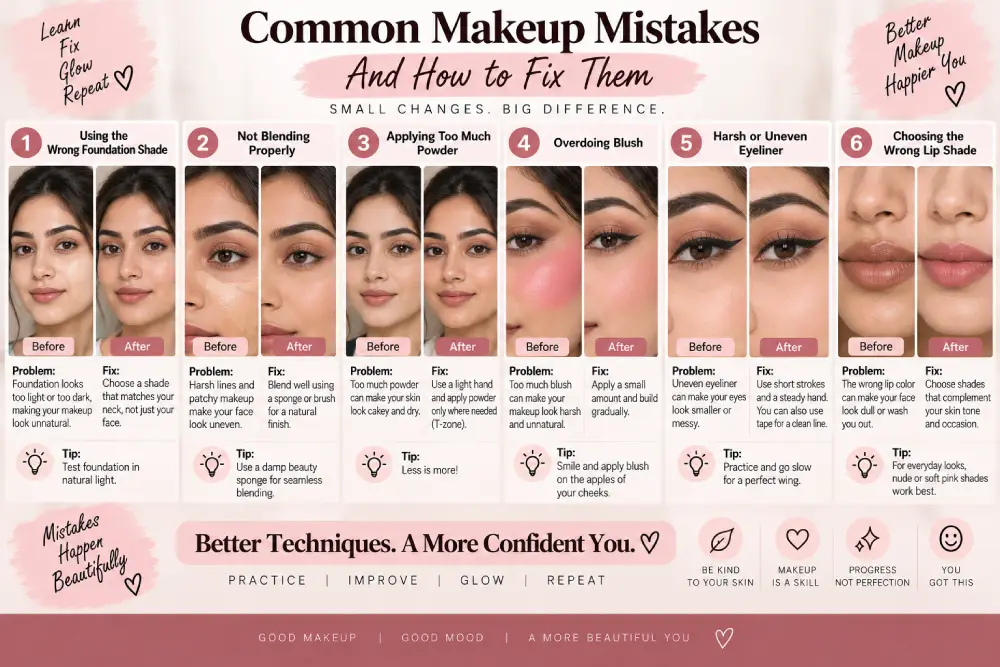
| Mistake | Why It Happens | Quick Fix |
|---|---|---|
|
Foundation shade mismatch |
Testing for shade on the hand or wrist rather than the jaw | Swatches for purchase along the jawline in the daylight |
| Cakey, heavy finish | (Making the same product repeatedly, without giving each layer time to set before applying the next one) | Apply in thin coats, allow to dry for one minute in between coats. |
| Harsh contour or blush lines. | Not feathering the edges (using too small a brush) | Use a damp sponge to lossen up the edges once the design has been applied. |
| Under-eye makeup creasing | Failing to use setting powder, or applying excessive concealer/moisturiser to this part |
Set with a light dusting of powder and avoid overloading concealer |
| Uneven appearance of the eyeliner |
Trying to draw a full line in one stroke |
(Apply in small dabs, then blend in and tidy up with a flat brush) |
| Makeup that will not stay on all day. | Omitting primer & setting spray, with humid weather. | Add both back in, give special attention to the T-zone as well. |
Makeup Tutorial: Myth vs. Fact
| Myth | Fact |
|---|---|
| But sure you need to set the entire face with powder. | Powder can be applied where ever you wish to have a dewy finish. It is primarily used in the T-Zone and under the eyes to set the foundations and therefore reducing creasing. |
| Contouring need to be bold to be effective. | Soft contour, well-blended, reads as natural definition not obvious shading particularly in daylight. |
| Cheap products have always been said to be inferior to expensive ones. | Performance has to do more with how it performs on your skin and your preferences rather than the price; a matching drugstore product can perform equally as well as a mismatched high end product. |
|
“Primer is a skippable, optional step.” |
Primer has a beneficial effect on the longevity and application of a make-up. This effect is enhanced when the skin is humid or oily. |
| If you want natural makeup, there‘s is no doing of you. | A natural-looking result generally still involves lots of choices of carefully applied products the work isn‘t visible. |
Troubleshooting: Quick Fixes for Common Makeup Problems
- Makeup sliding in humid weather: Apply a matt foundation primer, set moisturizer/oil-prone areas with translucent powder, then follow with a long-wear setting spray.
- Patchy foundation on dry skin: Increase hydration at the skincare step, and switch to a dewy or satin-finish foundation rather than a full-matte one.
- Eyeshadow fallout on cheeks: Do eye makeup first or remove fallout with a dry sponge before applying foundation.
- Lipstick feathering into fine lines: first line the lips and then apply a lip primer or a lightly-dusted ring of concealer around the lips to build the barrier.
- Brows looking too harsh: Blend with a spoolie immediately after filling in, and choose a shade close to your natural brow color rather than jet black.
Bringing It All Together
A good makeup tutorial is not really about memorizing 9 different steps, but understanding why each of those steps is there and knowing how to make each step work for your skin, your day, and the look you want to achieve. Use the complete step-by-step up there as a guide, take care of your skin, and feel free to cut out anything that isn‘t helping you achieve the look you want that day.
Once you have determined the style you are actually shooting for (a natural everyday appearance, a defined pose/aesthetic, a technique based style (such as the Latina makeup tutorial), or sometimes a cute look for a particular occasion), the next best step is to get straight into the guide that is detailing that style.
FAQs
What is the correct order for a makeup tutorial?
Usually it‘s skin prep, primer, foundation, concealer, setting powder, contour/blush/ highlighter, eyes, brows, lips, and a setting spray.
Do I really need primer for a basic makeup look?
You can get away with not using a primer however for a lasting and smooth application of your foundation (and a little longer wear) its best to use one, especially for Oilier skin types or more Humid countries.
How long does a full makeup tutorial routine take?
Once you‘ve got the hang of the steps, a complete routine lasts anywhere from 10 to 20 minutes. It will take a bit longer the first couple of times you‘re doing it.
What’s the difference between a natural makeup look and full glam?
A natural look involves fewer, lighter layers of product and is about a “your skin but better” effect. Full glam is all about creating more impact and coverage (particularly with contour, eyes and lips).
How do I stop my makeup from creasing during the day?
Set the under-eye and T-zone areas with a light layer of powder, avoid overloading those spots with concealer or moisturizer, and finish with a setting spray.
What makeup essentials do I need as a beginner?
At minimum: moisturizer, primer, foundation or tinted moisturizer, concealer, mascara, a neutral eyeshadow, blush, and a lip product. See the full makeup essentials checklist for a complete breakdown.
Can this tutorial work for any skin tone or skin type?
Yes — the order of steps stays the same regardless of skin tone or type. What changes is product formula (matte vs. dewy, lightweight vs. full coverage) and shade selection, which are covered in more depth in the style-specific cluster guides.