How to Use a Steam Iron: Settings, Steps and Fabric Care
Published: September 27, 2026 Last Updated: September 27, 2026 Quick Summary: Using a steam iron safely comes down to
Quick Summary:
Using a steam iron safely comes down to matching heat to fabric and ironing in the right order. Check the garment’s care label first, iron from the lowest-heat fabrics up to the highest (synthetics, then silk and wool, then cotton and linen), and use steam only on fabrics rated for it. In hard-water areas — common across much of India and parts of the US — a 50:50 mix of tap and distilled water reduces mineral buildup inside the iron. Most scorching, shine marks, and water stains come from skipping the label check or ironing a stain before it’s treated, both of which are easy to avoid once they’re part of the routine.
A steam iron for clothes does most of its damage in two ways: the wrong heat setting for the fabric, and ironing in the wrong order so a hot iron reaches a delicate item before it’s had time to cool. Neither mistake requires bad technique — they just require skipping a step that only takes a few seconds. Get the sequence right, and ironing becomes one of the more forgiving parts of a clothing care routine rather than the riskiest one.
Check the Garment Label and Your Iron’s Instructions
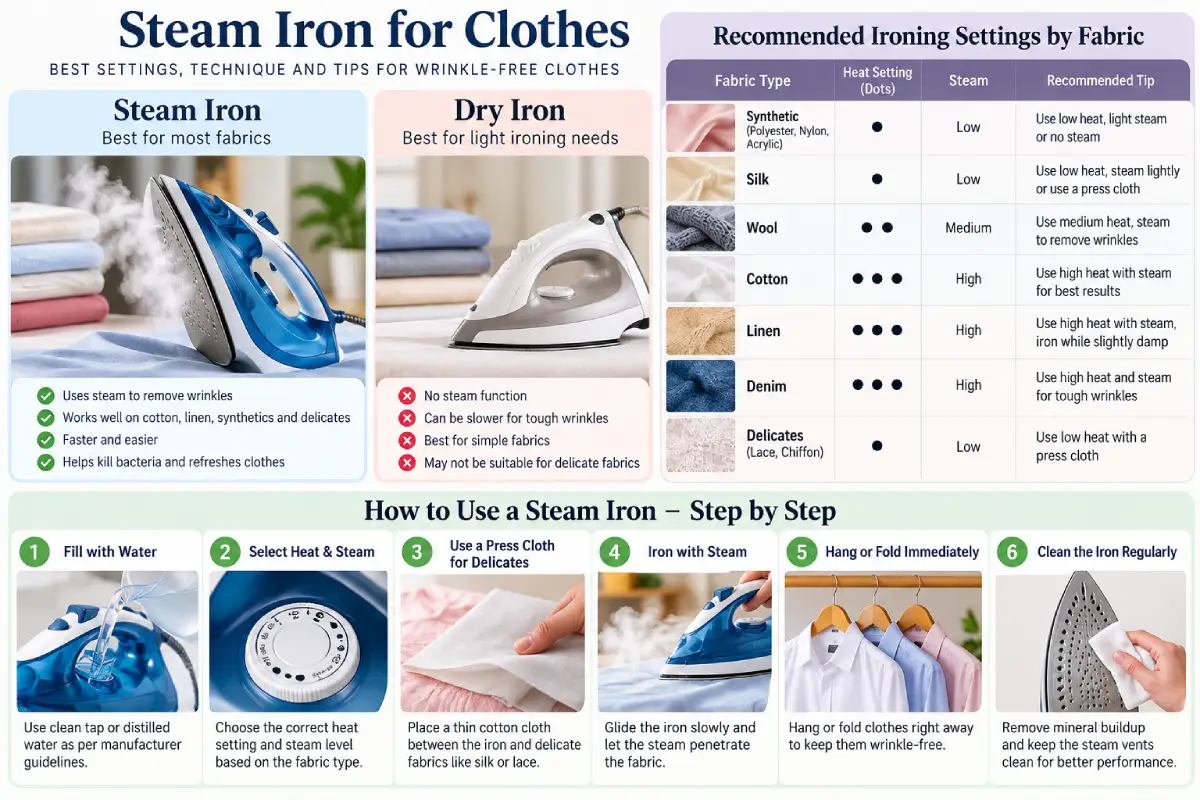
Before an iron touches fabric, the care label’s ironing symbol tells you the safe ceiling for that specific garment. The symbol is an iron shape with dots inside, and the dot count maps directly to heat level:
| Symbol | Heat level | Typical fabrics |
|---|---|---|
| One dot | Low heat | Synthetics like nylon, polyester, acrylic |
| Two dots | Medium heat | Silk, wool |
| Three dots | High heat | Cotton, linen |
| Crossed-out iron | Do not iron | Fabrics with heat-sensitive coatings, sequins, or certain synthetic blends |
If a label is missing or worn off, a quick test on an inside seam or hem — a small, hidden area — before ironing the visible part of the garment shows you how the fabric reacts before it matters if something goes wrong.
For mixed-fiber fabrics, such as a linen-viscose blend, the safe approach is to set the iron to the lower of the two fabrics’ recommended temperatures, not the higher one — the more heat-sensitive fiber in the blend determines the real ceiling, regardless of what the sturdier fiber could tolerate on its own.
Prepare the Iron, Water and Ironing Surface
A few minutes of setup prevents most of the avoidable problems that show up mid-iron.
Water matters more than people expect. If you’re in a hard-water area — common across much of India and in various regions of the US — using straight tap water causes mineral deposits to build up inside the iron over time, which can clog the steam vents and eventually leave white mineral residue on dark fabrics. A 50:50 mix of tap and distilled water reduces this buildup significantly; in genuinely soft-water areas, plain tap water is fine.
Check the soleplate before you start. Any residue on the iron’s plate — from starch, a fabric softener sheet, or a previous ironing session — can transfer onto the next garment and cause discoloration. A quick wipe with a damp cloth once the iron has cooled, done as routine maintenance rather than only when a problem shows up, avoids this.
Set up a stable, padded ironing surface with good lighting, and keep the iron’s stand or rest area clear so it’s never balanced somewhere unstable between passes.
Choose Heat and Steam Settings for the Fabric
Steam and heat aren’t the same setting, and getting this pairing wrong is one of the more common ways delicate fabric gets damaged.
Match steam to fabric, not to how wrinkled the garment looks. Heavier fabrics like cotton and linen generally benefit from more steam, since it helps the fibers relax and release deep creases. Delicate fabrics — silk, fine wool, anything with a satin or shiny finish — do better with little or no steam, since excess moisture combined with heat is what causes shine marks and water spotting on these materials.
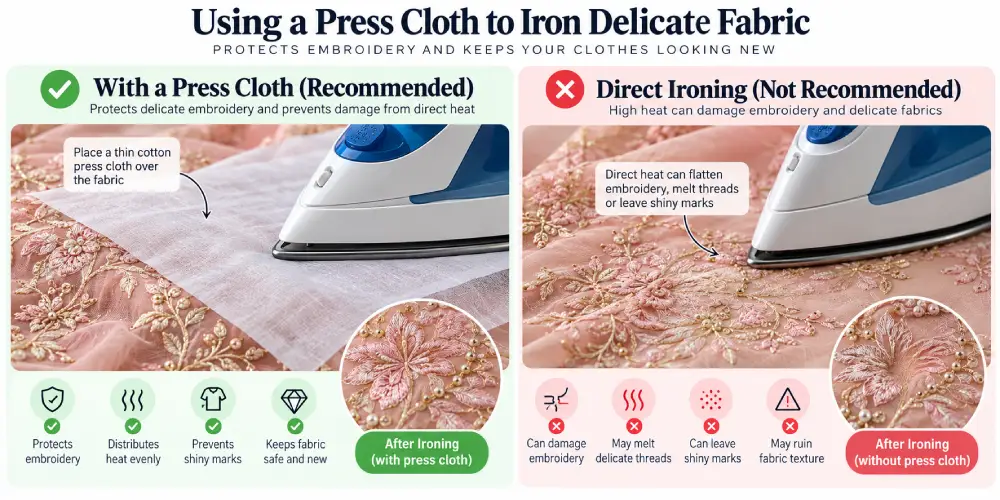
For anything genuinely delicate, ironing on the reverse side of the fabric, or placing a thin cotton press cloth between the iron and the garment, adds a buffer that reduces direct heat and steam contact — a useful technique for embellished or embroidered fabric, which is common in a lot of Indian ethnic wear and can be damaged by direct iron contact even at a “safe” temperature.
Dry ironing is the safer option, not a lesser one, for fabrics with any plastic-based trims, sequins, or heat-sensitive coatings, where steam’s added moisture doesn’t help and the risk of the trim melting or warping under heat is real.
Iron Clothes in a Controlled Step-by-Step Sequence
Ironing order matters as much as the settings themselves, because an iron takes time to cool once you turn the dial down — and a “cooling” iron at a hot setting can still scorch a delicate item pressed right after.
- Sort the ironing pile by fabric, roughly grouping synthetics, then silks and wool, then cottons and linens.
- Start with the lowest-heat fabrics first while the iron is still warming toward its full setting, and progress to higher-heat fabrics as the iron reaches temperature.
- Confirm any stains are fully treated and dry before ironing — heat sets stains into fabric almost immediately, turning something that might have washed out into a permanent mark.
- Iron with the fabric’s grain, using smooth, even passes rather than pressing down and holding in one spot, which is what typically causes shine marks on synthetic or silk fabric.
- Lift the iron over buttons, zippers, and embellishments rather than pressing directly on them, since concentrated pressure on a raised detail is a common cause of small burn marks or flattened trims.
- Hang or fold each piece immediately after ironing rather than piling finished garments together, since a stack of freshly pressed clothes can re-wrinkle before it’s fully cooled.
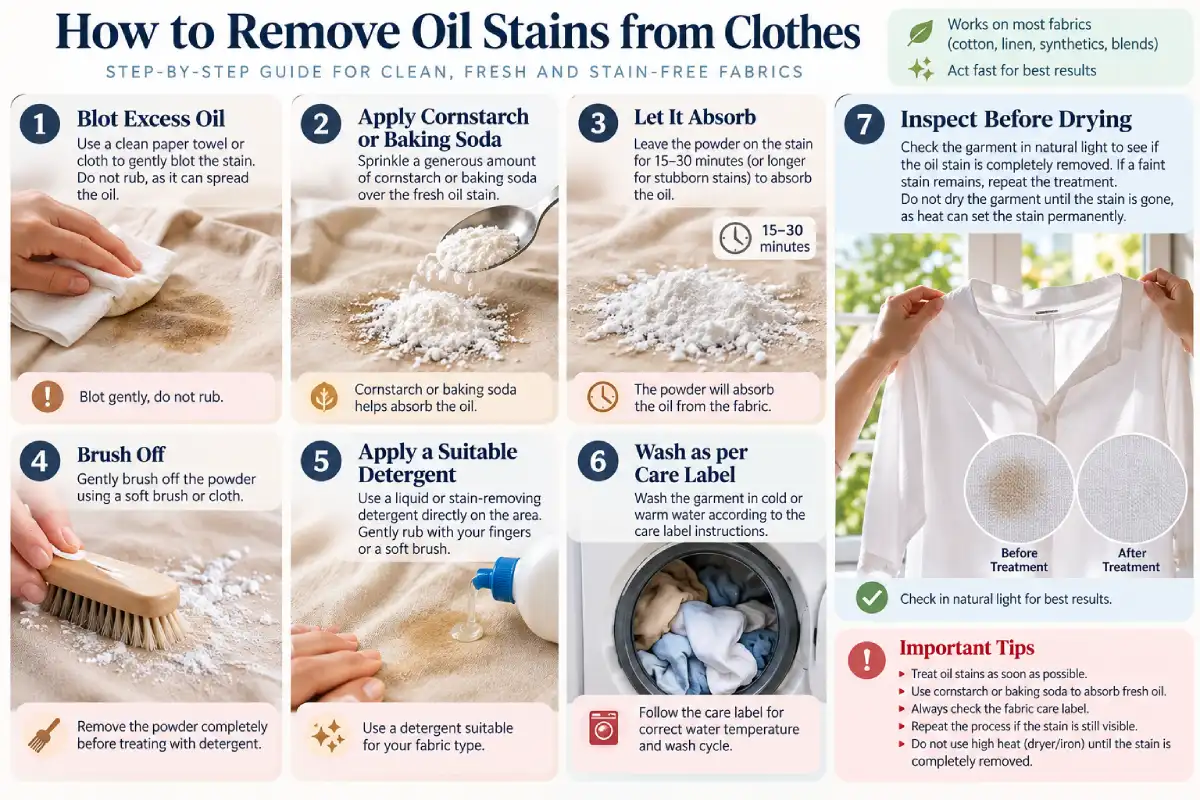
This guide walks through it step by step: How to Remove Oil Stains from Clothes: Step-by-Step.
Avoid Scorching, Water Marks and Common Ironing Mistakes
Most steam iron for clothes problems trace back to one of a handful of repeatable mistakes:
- Ironing at too high a setting “to save time.” A hotter-than-necessary setting doesn’t press faster in any meaningful way — it just increases scorching risk, especially on synthetic blends that can melt or glaze under excess heat.
- Ironing over an untreated stain. As noted above, heat can set a stain permanently, so any visible mark should be treated and confirmed dry before the iron touches that area.
- Using too much steam on delicate or shiny fabrics, which causes water spotting and a shiny, flattened patch that’s difficult to reverse once it’s happened.
- Skipping the cooldown period when lowering the temperature dial. Moving straight from a hot setting to a delicate item without waiting for the iron to actually cool is one of the most common causes of scorching on lower-heat fabrics.
- Letting the iron rest face-down on the board. Even at a low setting, prolonged direct contact can leave a mark or, over time, damage the ironing board cover.
Getting a steam iron for clothes right isn’t about mastering a complicated technique — it’s about checking the label, matching heat and steam to the fabric rather than to how wrinkled it looks, and ironing in an order that gives the iron time to adjust between fabric types.
FAQs
What’s the difference between steam ironing and dry ironing?
Steam ironing adds moisture that helps loosen fibers and release deep creases, which works well for heavier fabrics like cotton and linen. Dry ironing uses heat alone, without added moisture, and is the safer choice for delicate fabrics, fabrics with plastic-based trims or sequins, and anything where added moisture risks water spotting or shine marks.
Why do my clothes get shiny patches after ironing?
Shine marks usually come from too much heat or steam concentrated in one spot, often from pressing down and holding rather than moving the iron in smooth passes. Ironing on the reverse side of the fabric, or using a press cloth for delicate or shiny materials, reduces this risk.
Can I use tap water in my steam iron?
It depends on your water hardness. In hard-water areas — common across much of India and several regions of the US — plain tap water causes mineral deposits to build up inside the iron over time, which can clog steam vents. A 50:50 mix of tap and distilled water reduces this. In genuinely soft-water areas, plain tap water is generally fine.
What order should I iron clothes in if I have a mixed pile?
Sort roughly by fabric type and start with the lowest-heat items — typically synthetics — while the iron is still warming up, then move to silk and wool, and finish with cotton and linen at the highest heat. This avoids exposing a delicate item to an iron that’s hotter than the current dial setting suggests.
Is it safe to iron over a stain to make it less noticeable?
No — heat sets most stains into the fabric almost immediately, which can turn a treatable mark into a permanent one. Any stain should be fully treated and confirmed dry before that area is ironed.
FINAL CONCLUSION
Getting the most out of a steam iron for clothes comes down to two habits: check the fabric’s heat limit before you start, and iron in an order that gives the iron time to adjust between settings instead of trusting the dial alone. Add the right water for your area’s hardness and a quick soleplate check before each session, and most of the common scorching, shine, and water-mark problems simply stop happening. For everything else in the routine — washing, drying, and storage — the full Clothing Care Guide picks up where ironing leaves off.