Basic Clothing Repairs: Sew a Button and Fix a Seam
Published: September 27, 2026 Last Updated: September 27, 2026 Quick Summary: Most basic clothing repairs need only a needle,
Quick Summary:
Most basic clothing repairs need only a needle, matching thread, and a few minutes. Sewing on a button comes down to anchoring the thread securely, stitching through the holes 3–5 times (using a toothpick as a spacer for buttons on thicker fabric like coats), and finishing with a wrapped shank and a secure knot. Fixing a small ripped seam works the same way: turn the garment inside out, follow the original stitch line with a backstitch, and start and end about half an inch beyond the tear on each side so the repair doesn’t pull loose again. Structural damage — a torn zipper, a seam under heavy stress, or anything on a lined or tailored garment — is usually better handled by a tailor.
A loose button or a few centimeters of open seam are two of the most common reasons a perfectly good garment ends up at the back of a closet instead of back in rotation. Both are genuinely simple basic clothing repairs — no sewing machine, tailoring course, or special skill required, just a needle, matching thread, and a few minutes of patience.
Assemble a Small Clothing Repair Kit
A basic repair kit doesn’t need to be elaborate. A few items cover almost every small clothing repair you’ll run into:
- Needles in a couple of sizes — a finer needle for lightweight fabrics like shirting, a slightly heavier one for denim or coat fabric
- Thread in a few common colors (black, white, navy, gray) plus anything that matches garments you wear often
- Small scissors for trimming thread cleanly
- A few spare buttons, ideally saved from garments as they’re purchased, since many clothes come with an extra button sewn into a side seam or attached to a tag
- A thimble, useful but not essential, for pushing a needle through thicker fabric without sore fingers
- A toothpick or a spare pin, which plays a specific role in button repairs explained below
Keeping this kit somewhere accessible — rather than packed away — makes it far more likely a loose button gets fixed the day you notice it, rather than three wears later when it’s finally fallen off.
Choose Thread and Prepare the Garment
Matching thread color to the garment, as closely as reasonably possible, keeps a repair from standing out. For a repair on the inside of a garment — an inner seam, for instance — an exact match matters less, since it won’t be visible.
Before sewing anything, cut a length of thread around 18 to 24 inches. Longer than that becomes awkward to work with and tends to tangle; shorter means re-threading the needle more often than necessary. Thread the needle, then knot the two ends of the thread together so you’re sewing with a doubled strand — this gives noticeably more strength than a single strand for the same number of stitches.
For a button repair on lightweight or worn fabric, it’s worth reinforcing the area from behind with a small scrap of fabric before you start, since a button sewn directly onto thin or worn material can eventually pull through the fabric rather than the thread failing.
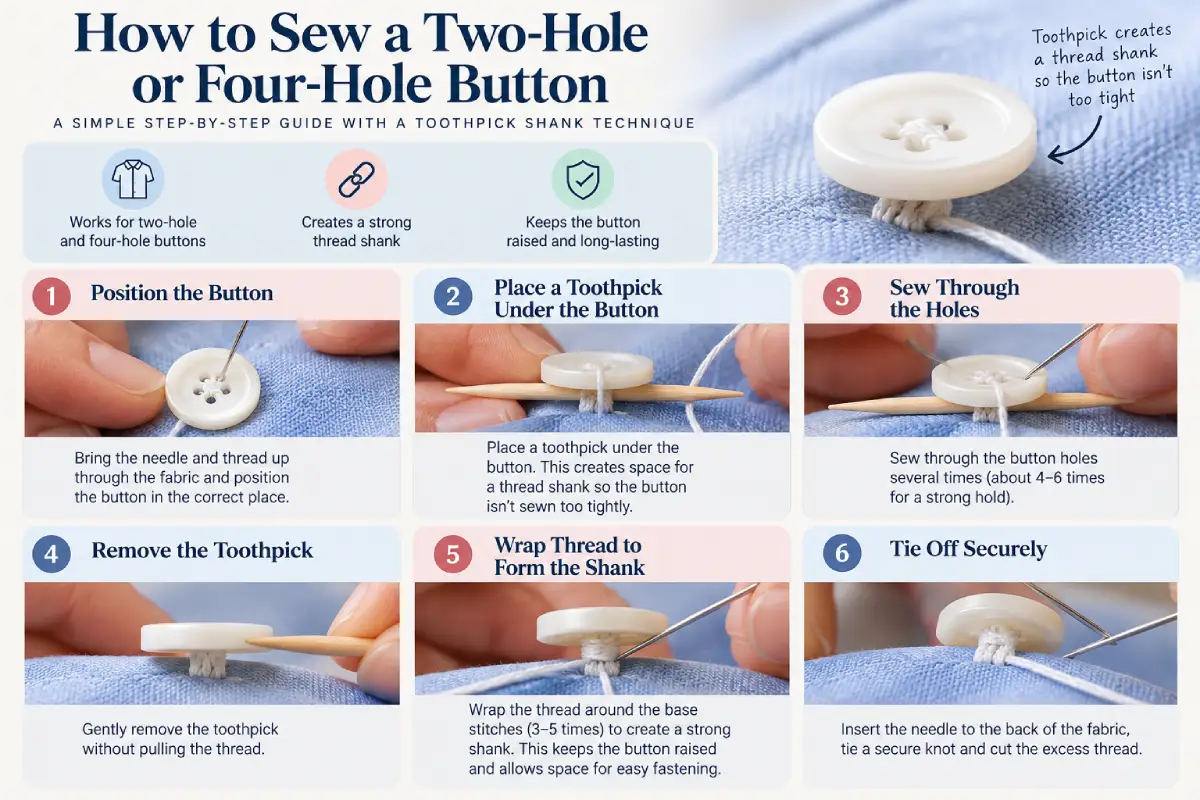
How to Sew a Two-Hole or Four-Hole Button
The core method is the same for both button types, with one difference in the stitching pattern.
- Mark the button’s exact position on the fabric, matching where the original button sat (use the corresponding buttonhole as a guide).
- Anchor the thread by taking a couple of small stitches at that spot before attaching the button — this creates a secure starting point rather than relying on a single knot to hold.
- Position the button and place a toothpick across its top, resting between the button and the fabric. This spacer is what creates the small amount of slack — called the shank — that lets the button close through a buttonhole later without straining or popping the thread.
- Stitch through the holes 4 to 6 times, sewing over the toothpick each time. For a two-hole button, sew straight back and forth between the two holes. For a four-hole button, either stitch in parallel bars (through one pair of holes, then the other) or in a crisscross “X” pattern — both are equally durable, so it’s a matter of preference.
- Remove the toothpick, then lift the button slightly away from the fabric and wrap the thread several times around the stitches underneath it, forming the thread shank.
- Finish on the back of the fabric by taking a couple of small stitches in place, then looping the thread through itself to knot it securely before trimming the excess.
For a heavier fabric like a coat or denim jacket, using a slightly thicker thread — sometimes labeled buttonhole or upholstery thread — holds up better over repeated use than standard sewing thread.
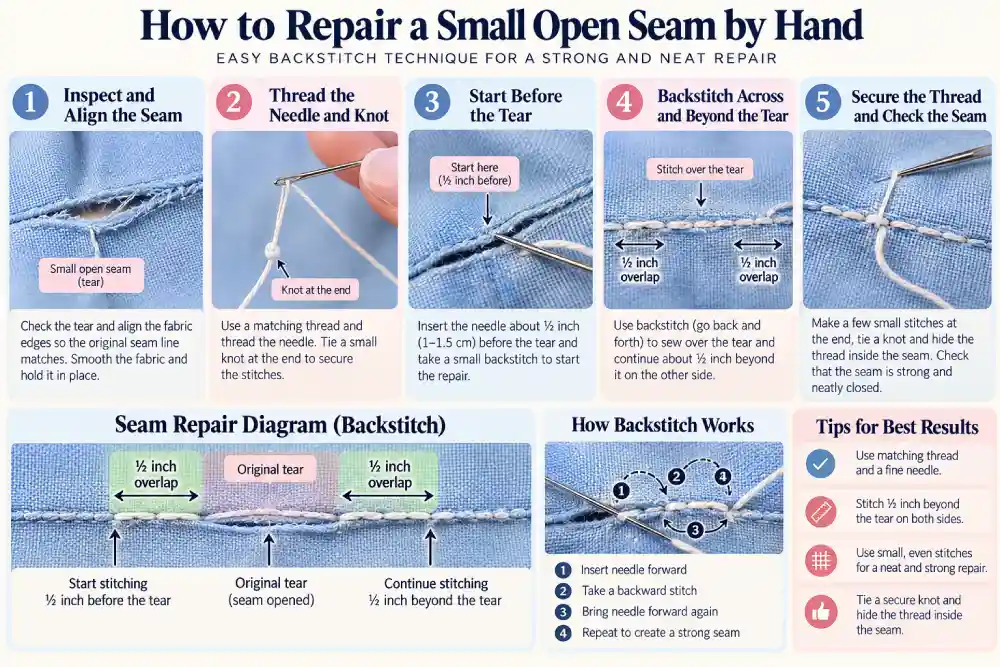
How to Repair a Small Open Seam by Hand
A seam usually opens because the original stitching wore through or came under more stress than it could handle at one point — not because the fabric itself failed. A hand-sewn repair, done correctly, is often just as durable as the original machine stitching for a small opening.
- Turn the garment inside out so you’re working on the same side as the original seam.
- Line up the two edges of fabric exactly as they were originally sewn, matching the existing fold line.
- Start your repair about half an inch before the actual opening, not right at its edge. Beginning slightly into the still-intact stitching, rather than exactly where the tear starts, prevents the new stitching from immediately pulling loose at the same weak point.
- Use a backstitch — inserting the needle slightly behind where the thread last came up, rather than straight ahead — since it creates a noticeably stronger, more secure line than a simple running stitch and holds up better under regular wear.
- Continue the backstitch along the original seam line, through the opening, and about half an inch past where the tear ends on the other side, overlapping onto intact fabric again.
- Keep even tension as you sew. Pulling the thread too tight puckers the fabric along the seam; leaving it too loose creates a line of loops that can snag. A relaxed, even pull that lets the fabric lie flat is what you’re aiming for.
- Knot off securely on the inside, then turn the garment right-side out to check the repair from the front.
See the dedicated guide: How to Dry Clothes: Air-Drying and Tumble-Drying Guide.
Check the Repair and Decide When to Use a Tailor
Once a repair is done, give it a gentle stretch or tug in the direction it would normally experience wear — this reveals right away whether it will hold, rather than finding out the next time you put the garment on.
Some repairs are genuinely better left to a tailor rather than attempted at home:
- A broken zipper, which usually requires specific tools and replacement parts rather than hand stitching
- A seam under high stress, such as an underarm or crotch seam, where the repair needs to withstand more movement and tension than a hand stitch reliably handles
- Damage on a lined or structured garment — blazers, tailored coats — where the lining and outer fabric need to be repaired together for a clean result
- Anything on a valuable or sentimental piece where a mistake would be costly to undo
For everything else — a loose button, a small opening in an everyday seam — a basic repair kit and a few minutes usually get the garment straight back into your regular clothing care routine.
FAQs
What’s the easiest way to sew a button so it doesn’t fall off again? Anchoring the thread securely before attaching the button, using a doubled thread strand, and creating a proper shank with a toothpick spacer are the three details that make the biggest difference. A button sewn flush against the fabric with no shank tends to strain and loosen faster than one with a small amount of slack built in.
Why does my seam keep coming open in the same spot after I repair it? This usually means the repair started and ended exactly at the edges of the original tear, rather than overlapping into the intact stitching on either side. Starting about half an inch before the opening and ending half an inch past it distributes the stress across a longer stretch of stitching, which holds up better.
Do I need a sewing machine for basic clothing repairs? No. A loose button and a small open seam are both well within reach of hand sewing with a needle and thread — a sewing machine speeds things up for larger projects, but isn’t necessary for the repairs most people run into.
What thread strength should I use for a coat button versus a shirt button? A slightly heavier thread — often labeled buttonhole or upholstery thread — holds up better on coats, jackets, and other heavier fabric that sees more strain, while standard sewing thread is fine for shirts and lighter garments.
When is it not worth trying to fix a seam myself? A seam under heavy stress — like an underarm or crotch seam — or damage on a lined or tailored garment is usually better handled by a tailor, since these need more reinforcement or fabric-matching than a simple hand repair provides.
FINAL CONCLUSION
Basic clothing repairs like sewing on a button or fixing a small open seam don’t require special skill — just a few reliable technique details: a properly built thread shank for a button, and an overlapping backstitch for a seam. Get those two habits down and a surprising number of clothes stay in your regular rotation instead of getting set aside over a fix that would have taken ten minutes. For everything that happens before and after a repair — washing, drying, ironing, and storage — the full Clothing Care Guide ties the whole routine together.